|
|
We help you make beautiful greetings cards | ||
| | Free Projects | Contact Us | | |||
|
|
Home - Techniques - Waterfall card How to make a waterfall card
Equipment and materials used to make this card.
Method
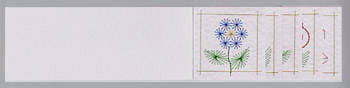
Prepare five decorated squares of card 60 mm x 60mm. The ones in the illustration have been made from designs in the Form-A-Lines flower squares stitching kit. Back the squares with thin card to hide the stitch work.
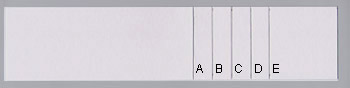
Cut a strip of card 60 mm x 270 mm. Turn the card strip face down. Use an embossing tool and ruler or score board to create fold lines. Fold A is 150 mm from the left-hand edge. Add four more fold lines at 15 mm intervals using the illustration as a guide.
Add a strip of double-sided self adhesive tape to the right of fold E. Use this to mount a decorated square in place. Add another strip of double-sided self adhesive tape to the right of fold D. Add another square.
Continue to add squares until all five are in place. Fold the card under at line A.
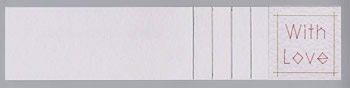
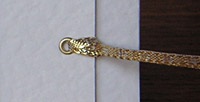
Add a gold eyelet to the end of the strip using the finished illustration as a guide. Add a piece of gold ribbon.
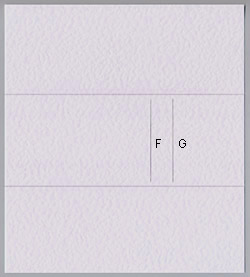
Lay the blank greetings card face up on a cutting mat. Cut slits at F and G using a craft knife and a metal ruler. Slit F is 120 mm from the left-hand edge. They are about 20 mm apart. Add a strip of double-sided adhesive tape between the two slits. Leave the top of the tape covered.
Slot the ribbon end of the strip in at slit F and out at slit G. Adjust the position using the finished illustration as a guide. Fix the end of the strip that is covered by the decorated squares with the double-sided self adhesive tape added earlier at F.
Fold the lower panel of the card in and secure with double-sided adhesive tape. This hides the back of the slot.
The waterfall card technique is demonstrated by David Jefferson.
|
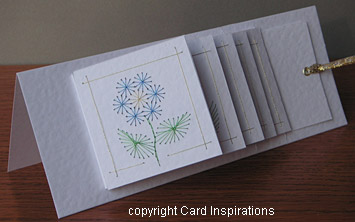
 Five decorative card squares are mounted on a sliding strip. When the tab is pulled they open like the leaves of a book. This card uses stitched designs from the Form-A-Lines flower squares kit.
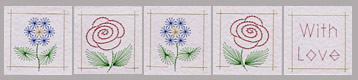

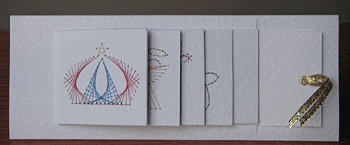 An alternative design using images from Form-A-Lines Christmas kit 13. The size of the squares are adapted to suit the images.
| | Privacy | Terms | Links | |
|
E-mail contact form. |