|
|
We help you make beautiful greetings cards | ||
| | Free Projects | Contact Us | | |||
|
|
Home - Projects - Tea Bag Cards - Christmas tree card
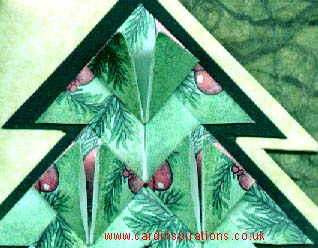
Christmas tree cardDescriptionTea bag paper folded and mounted in the shape of a tree. The front of the card is cut to echo the shape of the tree. "Merry Christmas" stamped and embossed in gold. Materials used
Method
Paper folding chart. Click here for a bigger picture.
Close view of fold You will need ten pieces of tea bag paper 4cm x 4cm (1.5in x 1.5in). The green shaded areas represent the right side of the paper, the white areas the wrong side of the paper. It is easier to work on a cutting mat with a grid marked on it or on a piece of paper with a cross marked on it (preferably a coloured piece of paper). The dotted lines represent folds you are about to make, the solid lines represent folds you have already made. Fold your tea bag paper as shown in the chart. In diagrams 1 and 2 you are creating creases by folding and unfolding. 1. Fold the paper into half and then unfold it. Fold in half the other way and unfold it. 2. Turn the paper over and fold from corner to corner then unfold it. Fold the other two corners together then unfold it. 3. Fold the lower half up and the outer edges into the centre, manipulating the creased paper into shape 4. 5. Fold the left hand upper corner to top point. Repeat with the right hand upper corner. Assemble the tree on a piece of green card. Note the way they overlap. Some sections simply sit on top of others. On others you will slot them together as follows: On the front square there is a slot formed by two pieces folded together, I call these the fangs. You slot these fangs behind the front square of a second section of the tree. The back part of the first section tucks under the back of the second section. Fix the pieces in place with adhesive. Cut the green card to the shape of the tree allowing a 3mm border. Stamp "Merry Christmas" on the greetings card with a gold ink pad and emboss with gold embossing powder. Or use a message sticker. Position the tree on the greetings card and fix with adhesive. Cut the front leaf of the card to the shape of the tree allowing a 3mm border. Cut a square of mulberry paper for the inside leaf of the card and fix in position with adhesive. * The tea bag paper used in this project has been discontinued by the manufacturer.
Christmas tree card made by Linda Jefferson. Christmas tree card project posted September 1999.
|
| | Privacy | Terms | Links | |
|
E-mail
contact
form. |